Showing posts with label eyepiece. Show all posts

Wednesday, January 28, 2009

Sidewalk astronomy

If you are an amateur astronomer, I do recommend that you try sidewalk astronomy. I have found it to be a truly rewarding experience. People are very appreciative of the effort and always have a great time. It is nice to take along a friend or another amateur astronomer for moral support. In fact, several telescopes really make it an event that will attract a crowd. The best time to go out is between First Quarter and Full Moon when deep sky observing is not possible. People love to see the moon through a telescope and are usually awestruck! When I started sidewalk astronomy, I never observed the Moon or planets for more than a minute or two during a session as I felt is was a waste of my time since I was only interested in deep sky objects. Now I enjoy lunar and planetary observing and have learned a great deal about these objects through my research which I conducted in order to better answer questions I was asked by the public. Anyways the best places to set up are areas of high foot traffic such as Barnes and Noble, and Starbucks. Attracting a crowd is easy when you have a telescope set up.Here is a picture of a small group around my scope in a Albertson's Supermarket parking lot. I had over 30 people come over to my scope and everyone enjoyed viewing the moon that night.


March, and the Messier Marathon grows near! AGAIN!

In the latter part of the eighteenth century, astronomers gained fame and wealth by discovering comets, still thought to foretell the future. One of these skywatchers was Charles Messier, who observed from Paris. Occasionally, M. Messier would chance upon a whitish blob, such as comets look when they are first seen. On August 28, 1758, he spotted such an object. Unfortunately, after watching it for a few evenings, he found that the blob maintained the same position among the stars, unlike a comet. Determined not to be fooled if he encountered the same object in the future, Messier determined and saved its coordinates. Over the next several decades, with the help of his colleague Pierre Méchain, many other entries were made in a list of deceivers. The list now contains 110 objects (though historians quarrel about the exact number), and are referred to as M1 through M110. A few objects had incorrect coordinates or may have been duplicates. It is generally agreed now that M101 and M102 are the same.This list has become the beginning observer's guide book, for it contains most of the interesting celestial objects to be found with a small (4" diameter) telescope. These objects include reflection nebulae, emission nebulae, planetary nebulae, open clusters, globular clusters, spiral galaxies and elliptical galaxies. Objects of all these types can look like a blob. (Modern telescope usually see open clusters as individual stars, but with the crude telescope Messier used many clusters looked like small clouds.) Interestingly enough, the first false comet Messier discovered was different from the rest. M1 is the Crab Nebula, the detritus from a supernova explosion.I mention all this because around the spring equinox it is possible to see all the Messier objects in a single night (sunset to sunrise). Only at this time are all of them far enough from the Sun to be seen sometime during the night (although M30 is quite difficult from latitude 40° north). Amateur astronomers call such an attempt a Messier Marathon. You'll need a dark sky, a medium-sized scope (4 to 8 inches in aperture, depending on experience), coffee, snacks and warm clothing. Of course you can see all of Messier's menagerie in bite-size chunks -- twelve monthly expeditions, four seasonal trips and so forth. But where's the fun in that? ?

Renting the 60" Mt. Wilson reflector telescope!

My club the High Desert Astronomical Society is confirmed for a night of observing at the 60" reflector up on top of Mt. Wilson. The outing is scheduled for April. This is going to be an awesome experience and I can hardly wait to go. Here is a little bit of the history of the telescope.The 60-inch reflector at Mount Wilson was constructed in 1908. Hale used the 60-inch glass blank that his father purchased for him in 1896. George Ritchey finished the glass blank into a mirror of the proper size in the Mount Wilson optical shops in Pasadena, California. Ritchey also designed the tube and mounting for the telescope, which were built by the Union Iron Works in San Francisco. The design drew heavily on experience gained with the use of the 36-inch Crossley reflector at the Lick Observatory.The telescope is supported by a 15-foot tube, which contains eight separate steel tubes and cross-braces designed to provide a stiffer truss and support system than was originally found in the Crossley reflector. The mirror is supported by a system of levers in a steel housing attached to the bottom of the tube and is fork-mounted on the polar axis. Just below the fork is a 10-foot diameter mercury float-bearing system designed to carry the weight of the telescope. The telescope is moved with electric motors. The 58-foot dome of the telescope is built from steel, on a concrete foundation, with double walls for the free circulation of air. This design is necessary to minimize temperature variations which could alter the shape of the mirror.Hale designed the optical system of the 60-inch reflector so that the instrument could be used for a variety of purposes. As a Newtonian telescope it was an f/5 instrument for photography and low-dispersion spectroscopy. In a modified Cassegrain configuration, using a convex hyperboloidal mirror before the prime focus and a plane mirror at the lower end of the tube to reflect light to the side of the tube, it could be used at f/16 for spectrography and an f/20 for photography. Finally, as an f/30 Coude, light was reflected by an appropriately geared mirror through the hollow polar axis into a constant-temperature room housing a large spectrograph. This flexible optical system, which allowed the telescope to be used for photographic and spectrographic purposes, was a model for future large reflectors. After the trip I will write a blog and post photos of the trip. Now maybe we will do the same thing at the Mt. Palomar Observatory next year!

Is it worth getting an OIII filter?


Yes it is! I ordered the Baader Planetarium Oxygen III filter from agenaastro.com. I have now spent several nights observing planetary and emission nebulae and the view through this filter is hands down amazing. Looking at the Veil Nebula is very difficult because it is so faint, but the OIII enhances and brings out every detail as well as seeming to brighten it. I was able to view both parts of the Veil and actually follow the entire ribbon from one end to the other making out every little wisp. The next Nebula I went to was M57 the Ring Nebula which normally looks good but with the filter I could make out more detail on the outer edges which I could not make out with the filter. The Swan Nebula showed so much more detail and textures in the cloud structure. Looking at the Lagoon Nebula was the same showing greatly increased detail but the filter icreased the size of the nebula by 40% by bringing out clouding that you cannot see without the OIII. Now the best view of the nigh was the Orion Nebula. There is so much there to see and the OIII adds so much contrast making the background velvety black that it seems to increase the brightness of the nebula. From what I have read and discussed and seen the OIII will work well in any scope with 8" of aperature or more. This one is hard to beat. This filter is among the narrowest transmission O-III filters on the market as such it effectively blocks the entire visual spectrum with the exception of the O-III transmission lines. Since the transmission of the light in the OIII is so efficient, fainter nebula seem to appear brighter and the extent of nebulosity that can be seen is greater so in fact you will see more of the fainter components.

Dual Speed Crayford Focuser w/ 10:1 Ratio


I have just installed a new GSO (Guan Sheng Optical) dual speed low profile crayford focuser with a 10:1 ratio on my 12.5" Dicovery PDHQ Dob. The focuser really has a nice feel and finish, better than I had expected. The focuser and the 1.25" adapter both utilize compression rings which will save my eyepieces from set screw marks on the barrels. I ordered it through Agena Astro and it arrived in 2 days. They always treat their customers right. Installation was a snap, I only had to drill 2 mounting holes in the telescope tube and that's it. I bolted it on and re-collimated my scope. My heaviest eyepiece setup is 4 lbs. and this focuser lifts it with no problems at all which seems to be the concern of some folks but that sure seems unfounded by me. With the micro focus I have been able to squeeze out the finest details from Jupiter and other objects.

Cleaning your telescope's primary mirror.

Okay here is the technique I use for cleaning my primary mirror. In the 4 years I have owned my scope, I have cleaned the primary and secondary mirror twice. Since I live in the desert my scope picks up alot of dust and I do hold off as long as possible before I do this. My mirror costs $850.00 to replace or $250.00 to recoat so I don't take cleaning it lightly. I have cleaned over 20 primary mirrors and have not had any problems with this technique. Here is the formula for the cleaning solution.....
2 cups distilled water
1/8th cup of 90% Isopropyl Alcohol
3 small drops of clear dishwashing liquid
I gallon of distilled water for rinsing.
1 bag of sterile cotton balls
You can get distilled water at the grocery store for around a buck a gallon.
Add the 2 cups of distilled water into a bowl, then add the alcohol, then the dishwashing soap (in that order) then mix with a spoon. you don't want the soap to foam up your mixture.
Remove the primary mirror from the mirror cell and blow off the dust with your breath. I don't use canned air because the propellant can damage your mirror coatings instantly. Fill your kitchen sink half full with lukewarm tap water and place the mirror in water face up and let it soak for around 10 to 20 minutes. Pour your cleaning solution in a bowl and add about 20 cotton balls into the solution. Take the mirror out and place it on a towell and keep it wet with the distilled water. Now take a soaked cotton ball from the solution and place it in the center of the mirror. Now drag the cotton ball using only its own weight (don't push down on it) to the edge of the mirror and throw the cotton ball away. Take another soaked cotton ball and do the same thing. Work your way in a circle around the mirror only pulling the cotton balls from the center to the edge. NEVER use a cotton ball twice. Always throw them away after 1 pass. After going around the entire mirror tilt the mirror up (in the sink) and rinse with the distilled water. The distilled water will mostly run off in a solid sheet . For any remaining spots of water use a paper towell folded to a small point and just barely touch it to the water droplet and it will soak it off of the mirror. That is pretty much it. Don't resort to cleaning the mirror unless it is REALLY dirty. If you end up 1 or 2 water spots don't worry about them for they will not affect your viewing at all.

Newtonian Telescopes

Newtonian telescopes are those which gather light on a mirror surface then reflect it to the eyepiece via a secondary mirror. They offer excellent deep sky views particularly from a good dark sky location.
Their simple construction makes them economic so large apertures are quite affordable and they are very easy to use. The main maintenance consideration is keeping dust off the primary mirror. Collimation may be required from time to time, this is the process by which you ensure the mirror is correctly aligned. That maybe sounds a bit complicated but in reality it is a simple adjustment which reflecting telescope owners soon get the hang of without much thinking about it. There are lasers available to make this job much easier.
If you want a real big aperture, go for a Dobsonian telescope. This is simply a big reflector tube mounted on a turntable which swivels on the ground. They are called a Dobsonian after their developer John Dobson, a legendary figure in amateur astronomy who has helped bring astronomy to the masses through concepts like Sidewalk Astronomy. Dobsonian telescopes are extremely easy to use and offer more bang for the buck so they are popular amateur astronomers.
You will sometimes here this type of telescope referred to as a 'Newtonian Reflector' after its developer Sir Isaac Newton back in the 17th century. He was not actually the inventor by the way but he is generally thought to have made the first practical one.
PROs and CONs of Reflectors
PROs
Simpler construction means this type of telescope is a lot cheaper to make for any given aperture. Being cheaper to make means they are cheaper to buy!
Short focal length types provide greater field of view
No chromatic aberration such as with refractors because there are no lenses in the design so no color effects.
The eyepiece is in a more user friendly position at the top of the tube an important point when trying to view something high in the sky.
More portable than refractors of the same aperture at least at the larger apertures
CONs
Some loss of contrast inherent in the design, the support for the secondary mirror being an obstruction in the light path
Require collimation from time to time especially if transported a lot
Shorter focal length models suffer from coma which makes off center object look a little distorted. This effect is negligible above focal ratios of f/6.

M13 in Hercules

My first image taken of M13


The Hercules Globular Cluster, also known as M13, is a densely packed ball of stars over 20,000 light-years away. Look overhead on a summer evening at the constellation Hercules. If you have very sharp eyes and a very dark sky you will see what appears to be a fuzzy "star". What you are actually looking at is more than 100,000 stars packed into a space about 100 to 150 light years across. One of the best theories is that Globular Clusters are the central cores of galaxies which were eaten up by our own Milky Way Galaxy. To find M13, look overhead after dark and seek out the "keystone" shape made by the four brightest stars of Hercules. You will find the globular cluster just off of the line connecting two of the stars . M13 is visible to sharp eyes in dark skies but will be resolved into a fuzzy round object in binoculars. Those of us with telescopes will see some of the individual stars that make up the cluster. Once you've found the Hercules Cluster, you can look for another similar object, the M92 Globular Cluster near by. These are just a couple of the many fine objects visible each summer.

Exploring the summer sky

The richness of the summer sky is exemplified by the splendor of the Milky Way. Stretching from the northern horizon in Perseus, through the cross-shaped constellation Cygnus overhead, and down to Sagittarius in the south, the Milky Way is packed with riches. These riches include star clusters, nebulae, double stars, and variable stars.
Let's start with the Big Dipper, our perennial signpost, which now lies in the northwest with its handle still pointing toward Arcturus. High overhead, and the first star to appear after sunset, is Vega in Lyra the Harp. Vega forms one corner of the summer triangle, a conspicuous asterism of three stars. Near Vega lies the famous double-double, Epsilon Lyrae. Two 5th-magnitude stars lie a little more than 3 arcminutes apart and can be split when viewed through binoculars. Each of these two stars is also double, but you need a telescope to split them.
To the east of Vega lies the triangle's second star: Deneb in Cygnus the Swan (some see a cross in this pattern). Deneb marks the tail of this graceful bird, the cross represents its outstretched wings, and the base of the cross denotes its head, which is marked by the incomparable double star Albireo. Albireo matches a 3rd-magnitude yellow star and a 5th-magnitude blue star and offers the finest color contrast anywhere in the sky. Deneb is a supergiant star that pumps out enough light to equal 60,000 Suns. Also notice that the Milky Way splits into two parts in Cygnus, a giant rift caused by interstellar dust blocking starlight from beyond.
Altair, the third star of the summer triangle and the one farthest south, is the second brightest of the three. Lying 17 light-years away, it's the brightest star in the constellation Aquila the Eagle.
Frequently overlooked to the north of Deneb lies the constellation Cepheus the King. Shaped rather like a bishop's hat, the southern corner of Cepheus is marked by a compact triangle of stars that includes Delta Cephei. This famous star is the prototype of the Cepheid variable stars used to determine the distances to some of the nearer galaxies. It varies regularly from magnitude 3.6 to 4.3 and back again with a 5.37-day period.
Hugging the southern horizon, the constellations Sagittarius the Archer and Scorpius the Scorpion lie in the thickest part of the Milky Way. Scorpius's brightest star, Antares, is a red supergiant star whose name means "rival of Mars" and derives from its similarity to the planet in both color and brightness.

Astronomical League Messier Club

Well I have finally completed the Messier Club requirements from the Astronomical League.
The Astronomical League offers special recognition in the form of a Messier Club Certificate for those that have observed most or all of the Messier objects. To qualify you must either be a Member-at-Large or be a member of an astronomical society which is affiliated with the League. To obtain an award you must observe the following rules:
Rule 1:
Observe 70 Messier objects and keep a record of your observations. Your notes must show:a. Date of observation;b. Time of observation;c. Seeing conditions;d. Aperture size of telescope;e. Power used;f. A short note describing your observation of the object.
Rule 2:
Have your notebook or record examined by an officer of your Society or a suitably qualified second party if you are not a member of a society and have this party forward a letter to the effect that you have made the necessary number of observations. So I will have the award pin and certificate within the next 6 weeks!

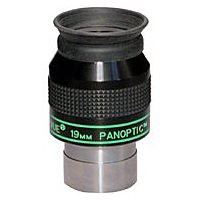
19mm Televue Panoptic eyepiece

19mm Televue Panoptic

If you have never bought any "premium" eyepieces, this is a great one to start with. Sporting a wider true FOV than your average 25 mm Kellner, the 19 mm Panoptic is one of the sharpest eyepieces I have ever used. It has also quickly become one of my favorite eyepieces in my F5 dob. Eye relief is a little tight for eyeglass wearers in my opinion but I am able to use it without my glasses with no problem. The 19 mm is also small although a bit rugged, and fairly light, which encourages more use and less of a balance problem. This eyepiece turns out to be just right in both the 12.5" dob and the 4" Mak for nebula, galaxy, and globular hunting. M13 is amazing thru this eyepiece, resolving stars to the core. Barlow it and your jaw will drop.With a FOV of 68 degrees it perfectally frames the full moon in my F5 scope. It will serve you well if you have an F5 scope, and it has excellent edge sharpness. It is more expensive then a Meade 18mm SWA or a Celestron 19mm Axiom but try those in an f/5 scope and you will never go back.If you have been contemplating the purchase of this eyepiece, I highly recommend it. The 19mm Panoptic gets an A+ for contrast, edge of feild sharpness, and its ability to be barlowed

Averted vision technique

When viewing through binoculars or telescopes, most deep sky objects look like faint fuzzy blotches of light - at first. The ability of the human eye to see intricate detail even in faint objects is truly impressive if one takes the time to develop the needed observing skills. First and most important is to make sure the observer is DARK ADAPTED. This means setting up in a dark-sky site with no white lights (streetlights, car headlights, porch lights, flashlights) in view. The pupils in the eye take a minimum of 15 minutes to fully dilate and thus adjust to see faint details in the dark. Now you are ready to use AVERTED VISION to discern fine details on astronomical objects. When viewing through the eyepiece, look not only directly at the subject but around the edges or even slightly off to the side. Slowly look back and forth and around it in this manner, and finer details will seem to flicker in out of the "corner of your eye"! This is happening because your peripheral vision is more sensitive to faint light than your direct vision, which is more constantly used. To preserve your night vision, use a red-filtered flashlight to read star maps or find your way around. A similar technique that employs the same principle is called scope rocking, and is done by simply moving the telescope back and forth slightly to move the object around in the field of view. It is also important to note that it also matters whether you avert right or left. The most effective direction is that which places the object on the nasal side of the vision. So, for right-eyed observers it is best to shift to the right, and for left-eye observers it is best to shift to the left. Some people also claim that it is better to avert up instead of down. The best thing to do is practice and find the best location for one’s own eyes.

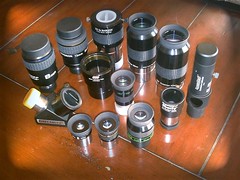
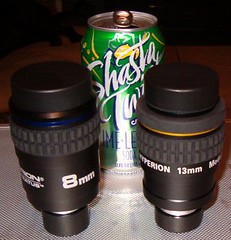
Choosing eyepieces


When beginning astronomers start looking at telescopes, one of the least understood aspects of these optical instruments are simple telescope eyepieces. While lenses and mirrors and designs are easy to grasp, the actual eyepiece itself can be somewhat confusing. However, they are vital parts of the telescope, as they provide the final creation and magnification of the telescope image and they are the one part of the telescope that spends its time in almost constant contact with the person using it. All of which means that telescope eyepieces are important considerations when putting together a telescope.
When looking at telescope eyepieces, remember that you are essentially paying for the lenses in the eyepiece. The more an eyepiece costs, the better the lenses inside and the better the image it creates. And, because the rest of the telescope is only as good as the image that reaches the user’s eye, it is well worth the while to invest a little extra in the eyepieces to be used on a good telescope.
It is also good to remember that image quality of telescope eyepieces can be affected by the design of the eyepiece. For instance, Huygens eyepieces can create chromatic aberrations, Erfle eyepieces can produce some ghost images, and Plossl eyepieces tend to have some astigmatism around the edges of the image. So, when choosing eyepieces, it is also a good idea to understand the limits of each design and what sort of work each design is suited to.
Another aspect to consider when choosing telescope eyepieces is the apparent field of view. This is the apparent width of the image, in degrees, which indicates how far a person needs to move their eye in order to look from one end of the image to the other. Essentially, it is a measure of the peripheral vision available to the person looking through the eyepiece. Depending on the design of the telescope eyepiece, the apparent field of view can range from 40 to 82 degrees. Obviously, the narrower fields of view give the feeling of looking down a tunnel, making it more difficult to scan the sky and find objects.
However, the field of view and image clarity are not the only concerns with telescope eyepieces. A major, but often overlooked, trait is that of eye relief. This is the distance between the eye and the actual lens surface and it is vital that people understand its importance. After all, this can affect the person using the telescope by simply making it uncomfortable or difficult to use the telescope. If someone doesn’t have room to wear their glasses when they look through the eyepiece, or their eyelashes rub against the lens, it is simply not worth the effort to use the telescope. And if someone’s eyelashes are rubbing against the lens, it is transferring dust and oils to the lens, degrading the image and, in fact, making the telescope less effective. Of course, the only way to really find the right eye relief is to try out several telescope eyepieces and see which ones feel right.
Overall, telescope eyepieces are best judged through experience, which means that trying out several designs and models is the best way to figure out what works best. But, with a little trial and error, the right telescope eyepieces can make their way into your telescope kit.